Clerk Webhooks: Data Sync with Convex
- Category
- Guides
- Published
This post covers how to synchronize user data from Clerk into a Convex database using Webhooks.
Composing an application out of multiple data sources can be challenging, and while Clerk’s Backend APIs work great for most use cases, Webhooks offer the next level of integration that enables you to take full advantage of your existing stack. This post will cover how to synchronize user data from Clerk into your own backend using Webhooks.
Data Sync with Convex
Convex is a real time Backend-as-a-Service Provider that makes building highly dynamic and interactive experiences with React easier than ever.
Clerk offers a first-class integration with Convex. The queries and mutations living in your Convex instance can be authenticated with a token that was created by Clerk. This integration is covered in more detail in the documentation.
Convex is also a great target for synchronizing user data from Clerk using webhooks, since you can take full advantage of Convex’s realtime capabilities for user data.
If you are not sure what webhooks are and how to use webhooks with Clerk, it’s recommended to read this getting started post first.
To demonstrate data synchronization with Convex, we can use Convex’s Clerk starter repo. You can clone and run this repo locally by following the instructions in the repo.
This post will:
- Explain how the demo uses data sync with reactive queries together
- Show code examples of the webhooks handler implementation in the demo
The Demo
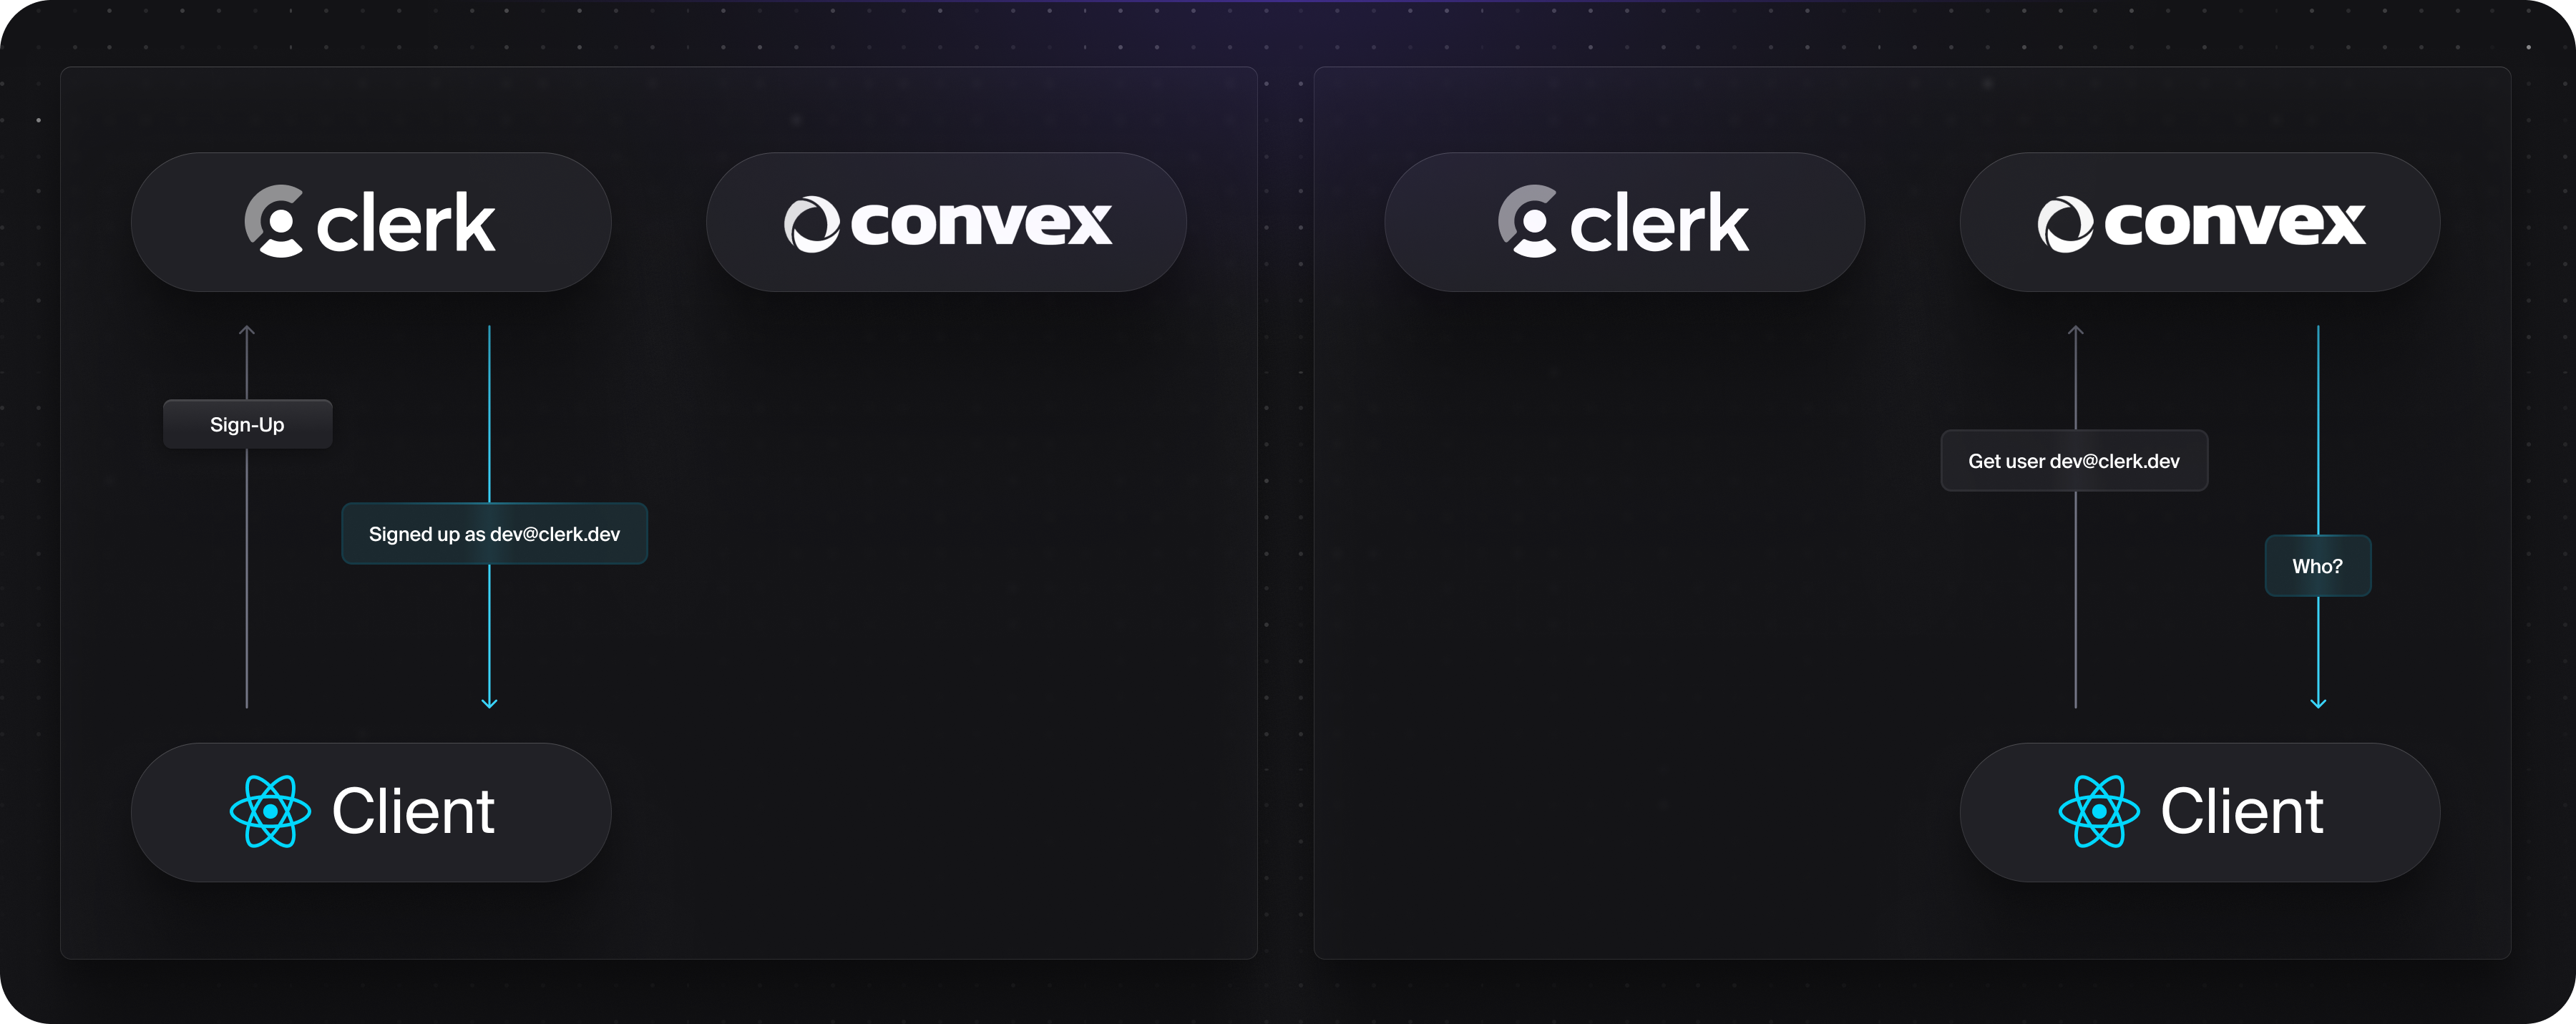
The demo application is a chat room where users can send and receive messages. To access the room, a user needs to sign up for an account using the Clerk integration. Once signed in, the user is redirected to a chat room, which establishes a reactive query to the Convex database. This reactive query looks for the user in the database, and returns a “No Clerk User” if the user is not found, and a “Logged In” if the user is found.
Initially after signing up, the user will not be found in the database. Since the signup process happened with Clerk, Convex has no record of this user.
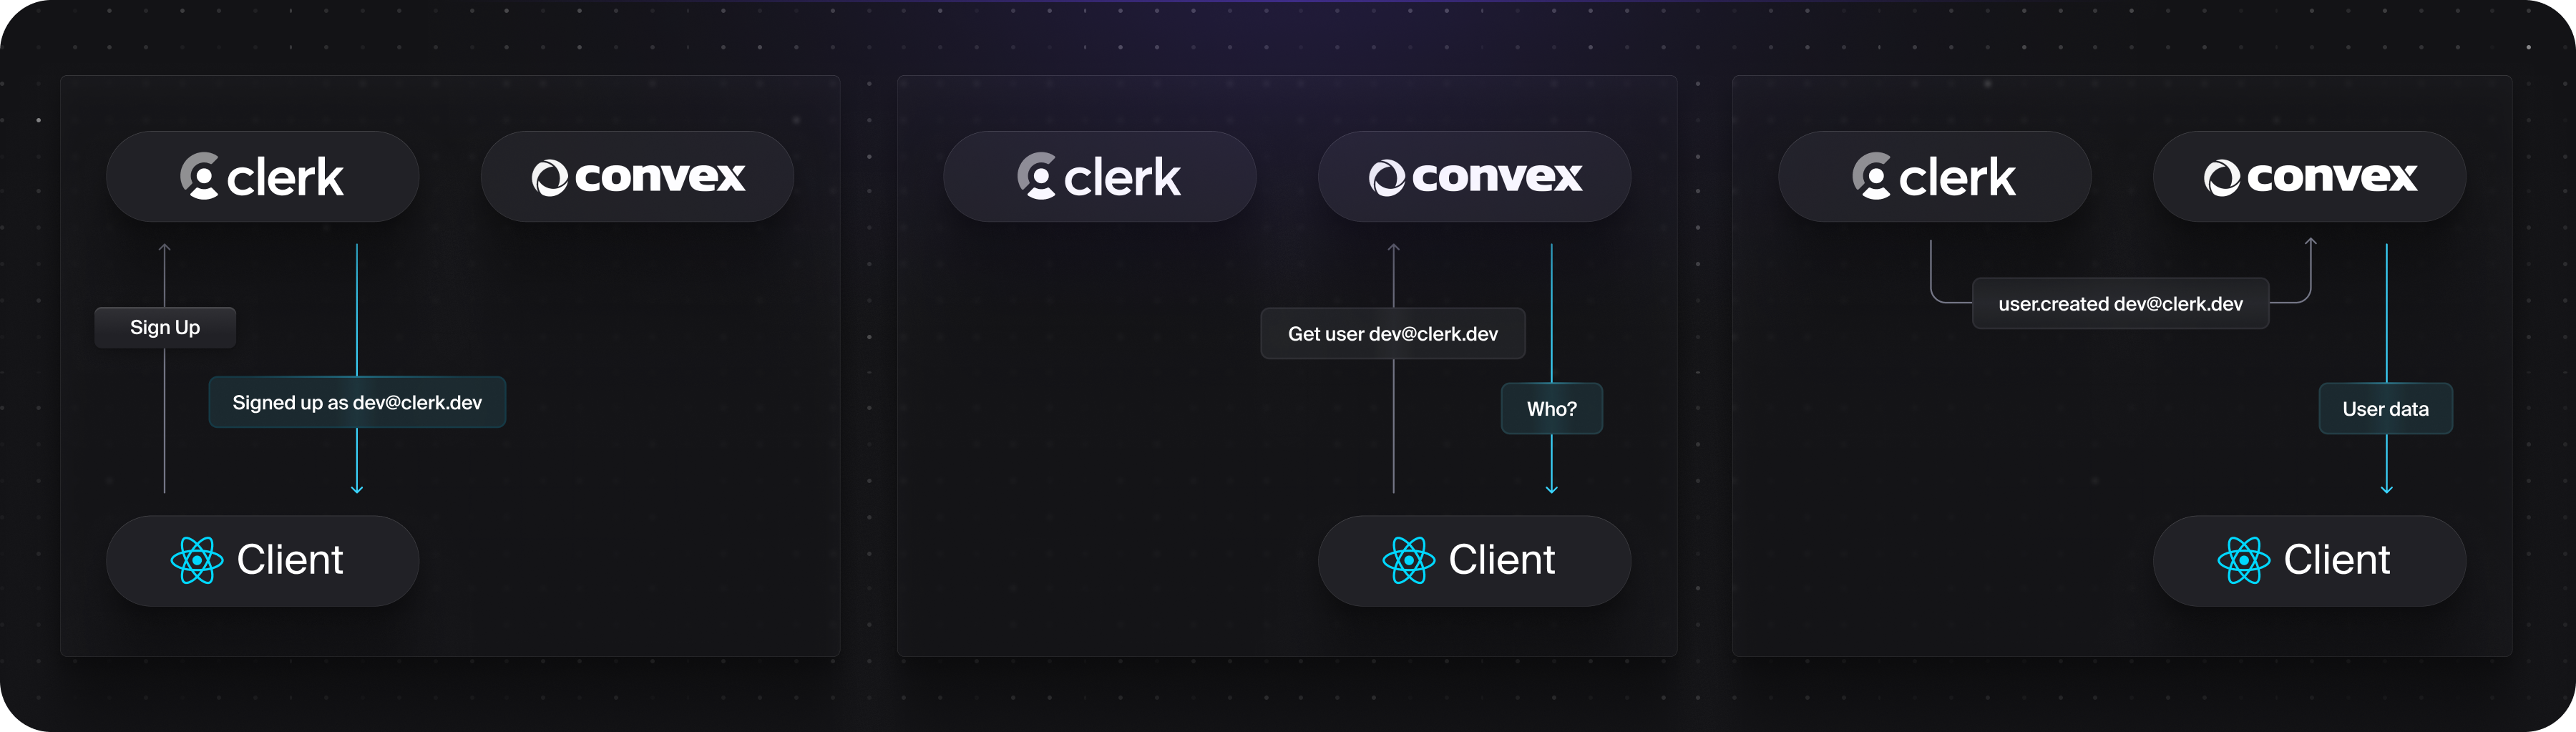
This is where webhooks come into play. After the user signs up with Clerk, Clerk will send an http request to a pre-defined URL with data about the sign up. This URL will point to a Convex HTTP Action, which will parse the data and create a record in the Convex database for the user. Now the client can query for this user again and receive the expected response.
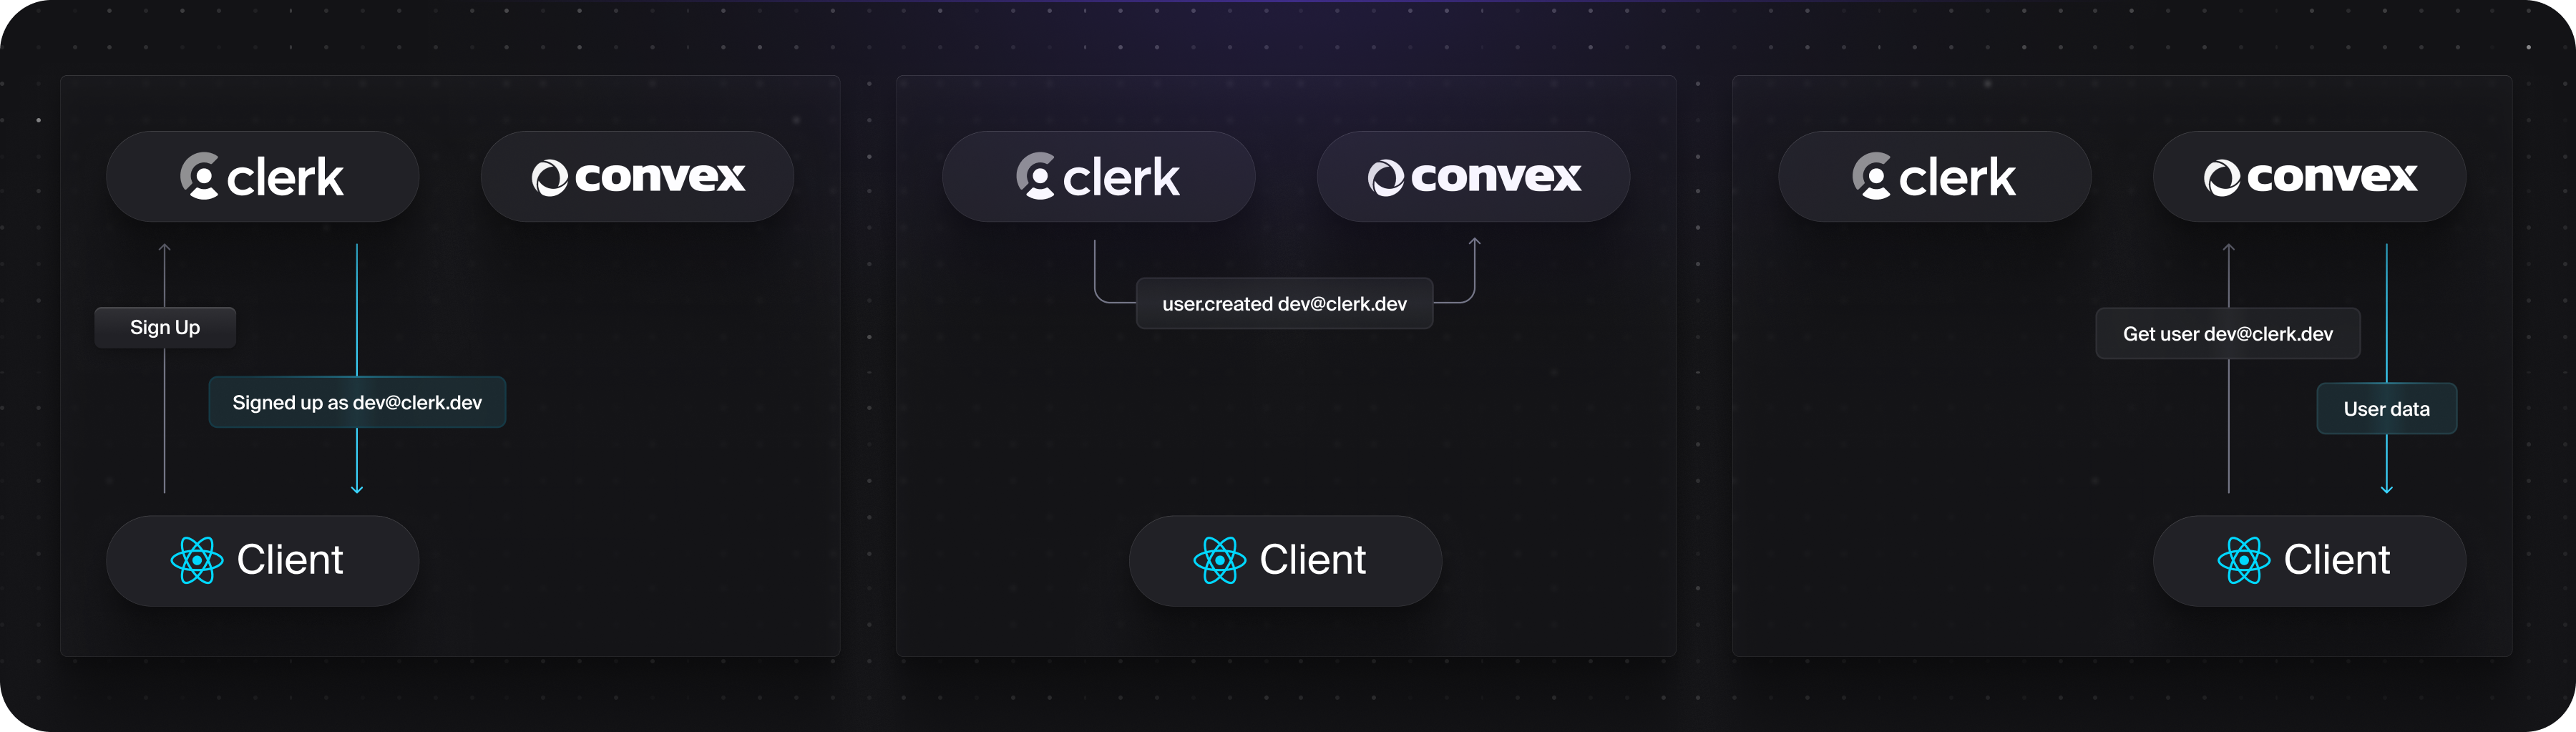
But since Convex queries are reactive, the client doesn’t need to retry the query, instead it will automatically receive an update from the server with the user data. This will trigger React to re-render the UI, providing the user access to the chat room.
The Code
To look at the webhook implementation, we can open the convex/http.ts file in this repo.
// define the webhook handler
const handleClerkWebhook = httpAction(async (ctx, request) => {
  const event = await validateRequest(request);
  if (!event) {
    return new Response("Error occured", { status: 400 });
  }
  switch (event.type) { ... }
  return new Response(null, { status: 200 });
});

// define the http router
const http = httpRouter();

// define the webhook route
http.route({
  path: "/clerk-users-webhook",
  method: "POST",
  handler: handleClerkWebhook,
});
The handleClerkWebhook function is responsible for… you guessed it… handling the Clerk webhook. It’s a function decorated with httpAction and receives the HTTP request and a context object to access other Convex resources.
This function runs security validation on the request to ensure that it came from a trusted source, and runs some database mutations based on the type of event received. The mutations simply mirror the event - creating, updating, or deleting a user in Clerk simply results in creating, updating, or deleting the same user in Convex. It forms a copy of the Clerk user table within Convex.
switch (event.type) {
  case 'user.created':
  case 'user.updated': {
    await ctx.runMutation(internal.users.updateOrCreateUser, {
      clerkUser: event.data,
    })
    break
  }
  case 'user.deleted': {
    const id = event.data.id!
    await ctx.runMutation(internal.users.deleteUser, { id })
    break
  }
  default: {
    console.log('ignored Clerk webhook event', event.type)
  }
}
This allows the most powerful feature of Convex - Queries, to access the user data directly, which means the application doesn’t need to make additional requests to Clerk to fetch the user data (also called the n+1 problem), and the user interface can get notified if the data changes (e.g. if the user changes their name or profile picture).
export const getUser = internalQuery({
  args: { subject: v.string() },
  async handler(ctx, args) {
    return ctx.db
      .query('users')
      .withIndex('by_clerk_id', (q) => q.eq('clerkUser.id', args.subject))
      .unique()
  },
})
Full Potential
Webhooks are a powerful feature that enable integrations with existing backend tools, allowing you to use their technical potential to the fullest, while also using Clerk's user management capabilities to the fullest. They help glue disjointed parts of the backend together so that you can pick whatever technology suits your use case for storing and processing data.
Ready to Integrate Authentication in Your App?
You can explore the Clerk Webhooks docs to learn more about the webhook events and data that is exposed by Clerk and build your own integrations today!
For more in-depth technical inquiries or to engage with our community, feel free to join our Discord. Stay in the loop with the latest Clerk features, enhancements, and sneak peeks by following our Twitter account, @ClerkDev. Your journey to seamless User Management starts here!